Recipe: Slow Cooker Baked Potato Bar

Leave a comment

Crock Pot Baked Potato BarEstimated Cost:  $5.00 +

Prep Time:  15 minutes

Crock Pot Time:  7 hours

Serves:  6

With the A/C working overtime to fight the heat, cooking in the sweltering months of summer can be a challenge.  Here is an inexpensive, super-easy way to make a meal easily adapted to the tastes of all around the table.  And more importantly, one that will keep you from working over the hot range or oven in  the dog days of summer.

Crock Pot Baked Potatoes:
6 large baking potatoes
aluminum foil

Suggested Toppings:
frozen broccoli cuts, cooked
chunky salsa
shredded Cheddar cheese
sautéed mushrooms
crumbled cooked bacon
sour cream
chili
chopped fresh chives
Sriracha hot sauce
Old Bay horseradish mayonnaise
Quick and Easy Chicken Gravy

1. Wash potatoes; pierce each potato a couple times with fork. Wrap each potato in sheet of foil. Place in slow cooker.

2. Cover; cook on Low heat setting 7 to 8 hours. (If you have smaller potatoes, aim for 7 hours; for super large potatoes, aim for 8 hours.)

3. After potatoes are done, have fun topping your baked potatoes with a variety of toppings.

Mike’s comments:

Granted, we don’t always have the time to bake our potatoes this way. When we do, however, this is my favorite way. It couldn’t be easier, and they come out wonderfully.

What are some of your favorite baked spud toppings? Please share on the comments section of this recipe. I will add them as you share!

Recipe: Alton Brown’s Blueberry Muffins

1 Comment

Alton Browns Blueberry MuffinsEstimated Cost:  $10.00

Prep Time:  15 minutes

Baking Time:  20 minutes

Serves:  12

I “lifted” this recipe from my all-time favorite culinary-hero, Alton Brown.  Specifically it’s from my favorite book Brown’s authored, “I’m Just Here for More Food“, which I highly recommend to anyone just learning to bake or trying to up their baking game.  The books subtitle pretty much sums it up:
food x mixing + heat = baking“.  I thought it only fair that I use Brown’s actual introduction to the recipe.

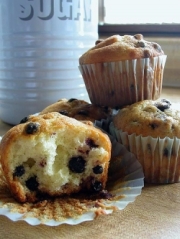
“If you walk into a Starbu… um, a coffee place these days and order a muffin, what you’ll get will be something between a carrot cake and a classic cupcake – that’s not a real muffin. Real muffins should be coarser and less sweet than a cake, and although they contain enough fat to be tender, I wouldn’t exactly call them moist. I would, however, call them delicious.”

The Dry Goods:
2 1/4 cups all-purpose flour
2 tsp. baking powder
1 tsp. baking soda
pinch salt

The Wet Goods:
1/2 cup sugar
1/2 cup vegetable oil
1 lg. egg
1 lg. egg yolk
1 cup plain yogurt

The Extras:
1 1/2 cups blueberries

1. Place the oven rack in the 2nd to top most position and preheat the oven to 375°F.

2. Grease and lightly flour your muffin tins (you will be making 12 total muffins).

3. Sift the Dry Works together in a large-mixing bowl. I like to combine all the Dry Works in the food processor bowl and pulse 3 or 4 times for sifting. Ensure they are mixed together well.

4. In a medium-bowl combine the Wet Works; whisk until well combined.

5. Make a crater in the middle of the Dry Works; pour Wet Works into crater. Mix by hand ONLY until combined. Do NOT over mix, this is key. Your batter is mixed as soon as the Wet and Dry Works are combined. Your batter will still have small clumps of flour mixture throughout – this is what you want. Fight the over-mixing demon with all the culinary courage you can muster!

6. Mix in the blueberries; mix only till combined.

7. Drop the batter into the prepared muffin pan(s). The cups should be full.

8. Bake for 18 – 20 minutes, or until a toothpick inserted into the bottom of a muffin comes out clean.

9. Remove from the oven and immediately turn the muffins (still in pan) on their sides so steam can escape the pans. Skip this step and you will more then likely end up with mushy muffin bottoms.

10. Serve immediately or store in an airtight container for up to a week or until they taste gross, smell bad, or grow fur.

Mike’s comments:

Alton Brown 1Mr. Brown originally created this recipe to be a “muffin template”. You can swap out the blueberries with 1-2 cups of any of what he calls “bits and pieces”. For example: nuts, berries, or chocolate chips. He does warn, however, no more then 1 cup of chips.

Alton Brown is the MAN. Check out his website, I think he’s brilliant and highly entertaining.

http://altonbrown.com/

Recipe: Sausage and Tortilla Chip Lasagna

Leave a comment

Sausage and Tortilla Chip LasagnaEstimated Cost:  $12.00

Prep Time:  15 minutes

Cooking Time:  25 minutes

Serves:  6

Very easy to put together with terrific results.  Kids of all ages love this lasagna.

1 pkg. (16 oz.) Hillshire Farm Smoked Sausage
1/2 cup onion, chopped
2 cans (8 oz. each) tomato sauce
1/2 tsp. dried oregano
1 can (15.5 oz.) pinto beans, drained
3 cups lightly crushed tortilla chips
2 cups shredded Monterey Jack cheese
1 can (3.8 oz.) sliced black olives, drained
shredded lettuce, sour cream, chopped tomato as optional toppings

1. Preheat oven to 350°F.

2. Cut sausage into 1/4-inch slices. Heat a large non-stick sauté pan over medium heat for 3 minutes. Add sausage and onion; cook, stirring frequently, 3-4 minutes, or until sausage is lightly browned.

3. Add tomato sauce, oregano, and pinto beans to browned sausage mixture. Bring to a boil; reduce heat to medium-low and cook 5 minutes, stirring occasionally.

4. Place 2 cups of crushed tortilla chips in the bottom of a lightly greased 13×9-inch baking dish. Sprinkle 1 cup of cheese and half of the olives over the chips. Pour sausage mixture over top; spread evenly. Sprinkle with remaining 1 cup of chips and 1 cup of cheese.

5. Bake at 350°F for 12-15 minutes or until heated through and cheese is lightly browned. Cut into squares and serve with remaining olives, shredded lettuce, sour cream, and chopped tomato if desired.

Mike’s comments:

I always have a bottle of Sriracha hot sauce on hand as the perfect condiment for this lasagna for those who prefer to bring a little heat!

Recipe: Macaroni and Cheese Ham Pie

Leave a comment

Macaroni and Cheese Ham PieEstimated Cost:  $8.50

Prep Time:  15 minutes

Cooking Time:  40 minutes

Serves:  6

I nabbed this recipe from the Betty Crocker website, I wish I could claim it as mine, but it was so delicious I felt there was nothing that needed changing.  So good that by the time I finish entering this recipe I’m going to want to make it!

3 cups shredded Cheddar cheese
1 cup diced cooked ham
1 cup uncooked elbow macaroni
2 1/4 cups milk
2 eggs
1/2 cup Bisquick
1/4 teaspoon salt

1. Heat oven to 400°F. Grease a 10-inch glass deep-dish pie plate with cooking spray. You can also use a glass 13×9-inch casserole pan. **Do Not use a pie pan smaller then 10-inch, I did and the ingredients did not fit!

2. In a large bowl, mix 2 cups of the cheese, the ham, and the uncooked macaroni. Spread in baking pan.

3. In an electric mixer OR a blender, place milk and eggs. Cover; mix/blend on medium speed until smooth. Add Bisquick and salt; blend until smooth. Pour over mixture in baking pan.

4. Bake at 400°F for 35 to 40 minutes or until knife inserted in center comes out clean. Sprinkle with remaining cheese. Bake 1 to 2 minutes longer or until cheese is melted. Let stand 10 minutes before serving.

Mike’s comments:

This recipe makes for a perfect all-in-one Sunday brunch solution. I couldn’t recommend this recipe any more strongly.

Recipe: Old Bay Horseradish Mayonnaise

Leave a comment

Old Bay Horseradish MayonnaiseEstimated Cost:  $2.00

Prep Time:  5 minutes

Chill Time:  1 hour

Serves:  12

A wonderful mayonnaise blend that goes wonderfully with seafood like Outer Banks Shrimp Burgers or Original Old Bay Crab Cakes.

1 cup mayonnaise
1/4 tsp. salt
1 Tbs. plus 1 tsp. horseradish
1 tsp. lemon juice
1/2 tsp. Old Bay Seasoning

1. In a medium-bowl combine all ingredients; whisk to combine.

2. Refrigerate for at least 1 hour to allow flavors to meld.

Mike’s comments:

I put this mayo blend on more then just seafood. It’s excellent on a grilled burger for a change of pace.

Recipe: Outer Banks Shrimp Burgers

2 Comments

Shrimp BurgerEstimated Cost:  $11.00

Prep Time:  15 minutes

Cook Time:  8 minutes

Serves:  4

The first time I had a shrimp burger was in the Outer Banks in North Carolina at a diner just off the beach.  I’ve tried to replicate that culinary experience for years, and I think I’ve gotten pretty close.

1 lb. shrimp, peeled and deveined
2 garlic cloves
1/8 cup cilantro or freshly chopped parsley
1 tsp. salt
1 tsp. paprika
1 tsp. onion powder
1 tsp. Old Bay Seasoning
1/8 tsp. cayenne pepper
1/2 cup Panko breadcrumbs
1 egg, lightly beaten
1 Tbs. vegetable oil
4 whole wheat hamburger buns
lettuce and mayonnaise if desired

1. Coarsely chop half of the shrimp and add to a medium-bowl.

2. Place the remaining shrimp, garlic, and cilantro in the food processor. Pulse shrimp mixture to create a chunky paste, approximately 5-7 pulses. Mix the shrimp paste in the bowl with the chopped shrimp.

3. Add the salt, paprika, onion powder, Old Bay Seasoning, cayenne pepper, Panko breadcrumbs, and egg; mix only to combine.

4. Form into 4 patties.

5. Heat a skillet over medium high heat with the vegetable oil. Add the burgers and cook for 3-4 minutes on each side. Serve on a whole wheat roll with lettuce and mayonnaise.

Mike’s comments:

The topping and condiment combinations for Shrimp Burgers are endless. Get creative and use items your family loves the most. One of my personal favorite condiments for Outer Banks Shrimp Burgers is Old Bay Horseradish Mayonnaise.

Recipe: Basil and Sun Dried Tomato Dip

Leave a comment

Basil and Sun Dried Tomato DipEstimated Cost:  $7.50

Prep Time:  10 minutes

Chill Time:  2 hours

Serves:  8

I love dips, this is probably due to the fact I am one myself.  Basil and Sun Dried Tomato Dip is really easy to make and is an awesome addition to any party.  Bring this dip to the next get-together you are invited to, and I guarantee you’ll be asked for the recipe.

6 sun dried tomato halves, packed in oil
1 cup all natural plain yogurt
2 1/2 Tbs. fresh basil, chopped
1 Tbs. extra virgin olive oil
1 clove garlic, crushed OR 1 tsp. garlic powder

1. Drain and chop sun dried tomatoes.

2. In a medium-bowl, combine sun dried tomatoes, yogurt, basil, oil and garlic; mix well. Salt and pepper to taste.

3. Chill for 2 hours to let flavors combine. (You can skip chilling if time is short)

Mike’s comments:

I like to serve Basil and Sun Dried Tomato Dip with pita chips and raw veggies. It’s even great with potato chips.

Recipe: Chicken Caesar Pasta Salad

Leave a comment

Chicken Caesar Pasta SaladEstimated Cost:  $10.00

Prep Time:  20 minutes

Pasta Cooking Time:  10 minutes

Serves:  6

An elegant salad that comes together in a jiffy.  I keep a few bags of diced oven roasted chicken breast in the fridge so I can whip this salad up on short notice.

6 oz. dry fettuccine pasta, uncooked
2 pkgs. (6 oz. each) refrigerated diced oven roasted chicken breast
1 can (14.5 oz.) diced tomatoes, drained
2/3 cup creamy Caesar salad dressing
1/4 cup red onion, chopped
1 pkg. (9 oz. each) chopped romaine salad
1/4 cup shredded Parmesan cheese

1. Break pasta strands in half. Cook according to pasta package directions. Rinse with cold water to cook quickly; set aside.

2. In a large-bowl, stir together chicken, drained tomatoes, dressing, and onion. Add cooked pasta.

3. Add lettuce to pasta mixture; toss to coat ingredients evenly with dressing. Sprinkle with cheese and serve immediately.

Mike’s comments:

This recipe is easily adaptable. Try substituting a different kind of pasta or lettuce.

Recipe: Carol’s Easy Chicken Vegetable Soup

1 Comment

Carols Easy Chicken Vegetable SoupEstimated Cost:  $9.00

Prep Time:  15 minutes

Cooking Time:  90 minutes

Serves:  8

A yummy and easy to prepare chicken veggie soup from my friend Carol.  Look to Carol’s comments, below, for some awesome variations!

1 Tbs. olive oil
1 medium onion, chopped
2 cloves garlic, minced (how to)
1 whole roasted chicken
1 stalk celery, sliced
2 bags (12 oz.) frozen mixed vegetables
1 tsp. salt
1/4 tsp. pepper

1. Heat the olive oil in a large sauté pan. When heated to medium, add the onion and garlic powder and cook until onion is tender and translucent.

2. Skin and debone the chicken. Put the skin and bones into a large stock pot with the sautéed onions. Over medium heat, bring the water to a boil; lower heat to simmer. Simmer for 30 minutes.

3. Shred or cube 3 cups of chicken while the stock simmers.

4. Strain the stock to remove the skin and bones. Add the frozen vegetables, celery, and chicken. Return to a simmer for 20 minutes. Stir and Enjoy!

Carol’s comments:

You can add ingredients like beans, canned tomatoes, etc.

One variation is to add a big jar of salsa and a can of black beans to the broth along with the vegetables and put some tortilla strips or chips on top when serving – BAM! Tortilla soup.

Recipe: Josh’s White Bean Hummus

Leave a comment

Josh's White Bean HummusEstimated Cost:  $7.50

Prep Time:  10 minutes

Refrigeration Time:  1 hour

Serves:  12

This is my first contributed recipe.  I am very excited about this.  This is my best friend Josh’s recipe, and he brought some of this most-excellent hummus to game night this past week. It was enjoyed by all.  The flavors were incredible but it was the smoothness that struck me immediately.  After talking to Josh I learned his secret – white beans NO garbanzos!

3 cans (14.5 oz.) Northern Great White Beans, 2 drained – 1 undrained
juice of 1 lemon
1 1/2 tsp. salt
5 garlic cloves
2 Teaspoons ground cumin
4 Tablespoons Tahini

1. In a food processor, combine the garlic, lemon juice, tahini, salt and cumin. Process until it has formed a thin paste without any chunks of garlic visible (1 to 2 minutes).

2. With the food processor on, slowly add the beans to the Tahini mixture. Add the beans through the feed tube slowly to ensure a creamier texture. Process until it appears creamy. Mixture should look a little thinner than you’d expect the final texture to be. If it seems as think or thicker then hummus simply add a little more lemon juice (1/2 tsp.) and reprocess until combined.

3. Refrigerate for at least 1 hour before serving. The hummus will thicken and the flavors will intermingle as it chills. Homemade hummus may remain refridgerated safely for up to a week; frozen for up to 3 months.

4. Traditionally when the hummus is served it is garnished with a light dusting of Paprika. Serve with pita chips and raw veggies. Also makes a wonderful condiment on sandwiches and burgers.

Josh’s comments:

I use a white bean instead of the traditional garbanzo/chickpea because I like my hummus to be smooth and chickpeas tend to be gritty. I also like my hummus quite garlicky, if you do not, scale back the cloves of garlic. This recipe is simple and straight forward, but for best results follow the order in which you put the ingredients into the food processor.

This recipe makes a large batch of hummus, great for potlucks or parties but if you are making it just for yourself you can scale it back easily. The seasoning combinations for hummus are endless, and while this is my favorite way, its very open to your personal interpretation and modification.

Older Entries Newer Entries